Monday, 25 February 2019

Guide: Sweating

This guide will teach you all about sweating animals within Entropia. The only tool that is needed is the VSE MK1, which every player gets right from the start, but a healing tool and a vehicle will be handy for this guide. (Valkyrie car can be acquired from Thule the tutorial area, and a Vivo S10 healing tool can be acquired from the gauntlet).

Note: The VSE MK1 can not be brought or sold, but can be put in storage, it is advised that you keep this gun on you at all time. If you go to another planet and leave your sweating device behind, you will not be able to sweat buy a new one, and the only way to get your one back is to go back to the planet you have stored it at.


Simple Sweating

To start sweating, simply go to the tools tab in your inventory (I on keyboard), and right click on the green round gun called the VSE MK1 to equip it. Then find a creature sweat,  click to target it, then press "F" key (Default), after a few attempts, you will see a green mist, this is the extracting phase.

In the extracting phase if you get hit or the creature moves out of your range, you will fail to extract. If you do not get hit and you keep the creature in your cross hairs for a few seconds, you will acquire some sweat.

After a number of extractions the creature will run dry on sweat, after this you will want to kill it, most people run to a turret and some shoot it, you can also drown the creature in water.

The skills you will gain while sweating are also valuable in a number of other professions, including hunting, mind force, and healing. With a tiny increase to other skills not related to these.


Group Sweating Locations

There are a number of locations where players sweat in a group to share damage to last longer, heal less and get more sweat. Overall this method will provide much more sweat in a shorter time but you will acquire less evade experience.

If the animal hits you, do not move and do not panic, it is not worth running, if the creature can hit you, it will hit you, moving does not effect your ability to evade a hit. If anything, the more you get hit, the more likely you will gain evade experience, the more likely you will be able to evade hits in future. The ability to evade is one of the more sought after skills for a hunter.


The easiest group sweating location to get to is Boreas. Teleport to the Isle of Troy then travel west to the edge where the land is no longer a solid green. From there you will be able to teleport or die and revive at Boreas. This is where a vehicle could come in handy.


Selling Sweat

The VSE MK1 does not degrade. You can use it as much as you want. This is one of the free abilities in Entropia, Sweat in itself is a valueless item to the system.
The value of sweat to a buyer depends on their needs for the sweat, and to a seller the value depends on their persistence to always be patient and look for a better price.

When it come to selling sweat, patience is a virtue, everyone has the ability to sweat, but not everyone has the ability to craft using that sweat, this means sweat is in a much higher supply than demand.

The best places to find buyers is at a group sweating locations, when a buyer wants to buy, the first thing they think is "Where are there lots of sweaters?".

These buyers tend to come and go in moments compared to how long sweaters sweat for at these locations. Calling out  "WTS Sweat" will not help, almost everyone wants to sell sweat.

The best thing you can do is to sweat a bit more to sell more for when that valuable buyer comes by, and when that buyer does come by, make a note of that persons name and their price, make a friend, and sell for the best price you can. Sweat is normally sold in stacks of 1000, check with other sweaters for the average selling price at the time so you know what to aim for and you are not undercutting yourself.

To learn more about trading in general click here.


Uses For Sweat

Last but not least, many new people wonder what sweat is actually used for. The top 3 uses for sweat are making mind essence, making welding wires and missions.

Mind essence can be made by mixing force nexus and sweat in a refiner. Force nexus is an energy matter that is mined. You are able to purchase a standard refiner from a trade terminal.

Some blueprints like the welding wire blueprint requires sweat along with other materials, welding wires are used like ammo with the vehicle repair tool to repair vehicles.

There are also a number of missions that require sweat to complete, a few examples of these are the Arkadia Passport missions and Missions Galactica.

Guide: Finding Items

In Entropia it is possible to stumble across free natural items simply by running. These items include fruit, natural stones and dung.

In previous versions of Entropia, walking was needed to find natural items. Now you are able to find fruit without the need for walking!

Hide And Seek


No skill is required or gained in searching for natural items.

The best way to find natural items is to walk the paths least walked, they can spawn anywhere on the floor across any planet, so the places least walked will surely be more likely to have more! It is best to have the camera in 3rd person to get a good view around your character, as it is more than likely to spawn exactly where you are standing or behind you as you walk.

Naturally spawning items come into view at a much smaller range than everything else you can see and will vanish after a short time. Walking to find fruit can help by pressing "Q", but is not need. When you do find items, simply right click on it and to pick it up.

Specifically going out and looking for natural items is harder than sweating and will require more patience. Also as there is no skill gain in finding these items, your character is not growing.
.
Fruit can be refined into nutrio bars by putting any fruit and sweetstuff into a refiner, sweetstuff is an energy matter which is mined and nutrio bars are used to feed pets. Natural stones are used in crafting and dung are used by land owners.


Finding Oil


Roctropia Docks (Red Square)
There are a number of locations in Entropia where you will be able to find and collect crude oil.

These barrels can be found in certain PvP areas, on Calypso, Arkadia and Rocktropia. You can not be looted in these PvP areas, so you can try as much as you want without worrying about losing anything. If you do happen to get attacked, you will likely gain evasion and dodge skill.

Arkadia Oil Rig (Red Circle)
The easiest place to get access to crude oil is the docks on Rocktropia, as there are no animals or robots in this area to attack you, you can  simply walk into this area on foot with no issues and the respawn point is right next to the area.

The closest teleporter to the docks which every new person starts with is The Hyperplex.  Crude oil will spawn anywhere in the dock area on the floor.

The only threat here is a very small minority of other people, most people come here for oil and do not wish to waste ammo.

The oil rig on Arkadia is harder to get to because it is surrounded by the native life. The best way to get to the center of the rig is to fly in a vehicle. The closest teleport to this rig is Scrap Yard.

Crude oil can be refined into oil, which can be crafted with or used to refill your vehicles.

There are a number of other rigs that exist in Entropia, for example the Beer Garden on Rocktropia drops the Motorhead kegs. Which are used specifically in crafting items using blueprints from Rocktropia.

Calypso's oil rig is a lot harder to get to, the amount of oil that is dropped is worth shooting for, even if you are able to get past the native life, you will more than likely be shot by a fellow Entropian here.

Guide: Edit Interface

This guide will show you how flexible the overall interface in Entropia is, here you will learn about the chat interface, heads up display, waypoints, keyboard controls, contacts list and a few other display related options.


Right Click

Holding right click will bring up a context menu with other options relating to the target. Vehicles, avatars and creatures have extra options which can be accessed this way. If you right click your health bar, you access options relating to yourself, you are also able right click your vehicles health bar too. When in first person view right click is interact.


The Edit Panel

Normally only the radar, global display and chat windows can be moved, buttons can only be clicked/right clicked.

Pressing the "L" key on your keyboard will bring up the "Edit Panel". While the edit panel is open you will be able to move/add/remove most of the buttons that are on your screen simply by dragging the buttons. "F1" through to "F9" lets you to switch between layouts, allowing you to set up multiple key bindings and on screen buttons. The first layout on the keybinding map when you open this menu allows you to edit all key bindings from page 1 to 9, this page is defined by a "*" and allows you to edit the default key layout of all sets, these keys can be overwritten by each individual set without effecting the main set.

The edit panel consists of two windows, the main window and the recycle bin window, this is where you can drag buttons you no longer want.

The first button on the main window will bring up the keyboard layout. This is where you can bind buttons to keyboard keys, allowing you to quickly access to things from your inventory or an action.


The second button will open the Action Library. This is where you can find buttons for actions in Entropia. A few examples of action buttons in Entropia are emotes, dances, vehicle controls, interface controls and interaction controls. The of the most useful actions in Entropia is the "Use Tool" and "Interact" buttons, these are the two main buttons for interacting with the world.


The third button will resets your current interface layout and the forth button on the edit panel simply resets everything back to default.

While the edit panel is open, you will be able to drag items from your inventory to your screen or keyboard. This includes weapons, armour parts, clothing, tools, vehicles and mind force chips.

You are able to create a button to equip multiple clothes or multiple armour part in one button, this can be done by first equipping what you want, then right click>Equipment>Create Armour/Cloth Set. This also drastically speeds up the equipping time of these items.


The Chat Interface

The chat system is as simple as any other game, press enter, type message, press enter again to send. If you press up or down while the chat window is active, you will be able to scroll threw previous messages, this is handy for trading.

To change what chat channel you are talking in, on the left of where you type your message will be the channel name of the channel you are talking in, click that to change channel. The default will be [Local].

[Local] Non-trade, local area chat.
[Trade] Local area chat used for trading.
[Rookie] A global channel for advice.
[Society] Global channel, chat with society.
[#Trade] Any channel starting with a "#" is a custom chat channel created by a player. These channels are global chat channels.

You can also change your chat channels by clicking on the channel link in the chat window next to a players name chatting in that chat channel already.

If you right click the tabs at the top of the chat window, you can select what channels you want to display in what tab and what colour to display it in. You will also be able to create new tabs and remove unwanted tabs.

If you drag a tab off of the window, you can create multiple chat windows, to merge a window simply drag it to the window you want. The button next to the X top right, the arrows point down, merges all tabs in that window to the main window.

To send a private message to someone, simply click their name link in chat or right click their avatars and goto avatar, private chat.

There are also a number of chats commands which you can used, the most commonly used command is "/pos" or "/p" which displayed your position in the chat channel you are in, in the form of a nice clickable waypoint. Another useful command is "/join #channel", which is used to join a custom chat channel. To see a full up to date list of commands type "/help".


Map And Waypoints

To bring up the map press "M", here you will be able to see your location, known teleporter locations and known area location on the map. Missions with a waypoint that are currently active will show up here along with any custom waypoints added.

To add a custom waypoint to the map, right click the location, then click add waypoint.
Alternatively, you can also click on waypoint link from chat to add a waypoint someone sent.

If you right click a waypoint added on your map, you will be able to rename and copy that waypoint allowing you to send waypoints with custom names. Walking over a waypoint automatically removes it from your map.

To add more teleporter location, you must find and walk over the teleporters, once added you can freely move between teleporter.
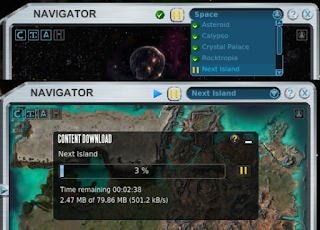

The map can also be used to download space stations, planets and space itself all in game. With the drop down menu at the top, select what map you want, then click the play/pause button next to it start/pause downloading. A window will pop up with a download bar.

When on a planets, you will only be able to see space and other planet  related maps in this drop down menu, for example Arkadia and Arkadia Underground, when in space you will see all the planets here.


The Message Center, Sticky notes and Contacts

In the top left corner of your HUD, you will find the message center button, and in the top right corner of your HUD is the contacts list button.

The message center will turn orange when there are unread messages with the number of unread messages showing up as a number above it, and what type of message it is under.
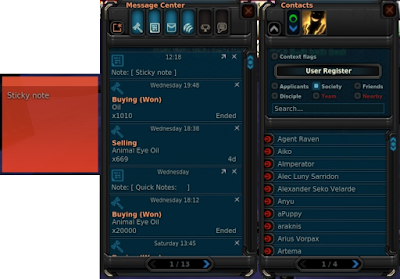

Along the top of the message center screen you will see 7 buttons, the little button on the left is the 'New' button, this is used to create a message or a sticky note. Message center messages are able to be sent to offline people and are kept in the message center until deleted, just like an in game email.

Sticky notes are a handy way of storing handing information in a note on screen, these notes are also stored in the message center until deleted. To remove from screen and save in the message center, click the arrow buttons in the top right of the stick notes corner. To change the sticky note colour or to delete the sticky notes, click the setting button in the top left corner of the note.

The 6 other buttons along the top of the message center are used to filter messages in the message center, from left to right these are what the buttons filter: "Auction Messages", "Sticky Notes", "Mail", "System Messages", "Global/Hall Of Fame", and "Tutorial Messages".

The contacts window will give you the ability to change your player profile and online visibility to other people. You can also view and send messages to friends, society members and disciples.

Setting And Other Options


There are a few more interface options in the setting, which is accessed via the "Esc" key. In the setting, and clicking HUD.

If you disable the loot window, instead of a window filling up with loot that you have to keep closing, you get a small temporary display of the loot in text with the trade terminal value next to it in the top left corner of the screen.

Here you will also be able to adjust the frequency of the global ticker, the higher the PED the less frequent, and how the ticker is displayed, always visible or invisible when not active.

A few other useful options here are the text size options, hide tutorials and align satnav with camera. Changing the satnav option will effect if the satnav is locked to north or lock to the the camera.

The current interface has only been recently released, and as continued update are applied more options may become available very soon in the future.


Default Control Setup

Default Moment Controls:
W - Move forward
S - Move backward/Towards camera
A - Move Left/Strafe Left
D - Move Right/Strafe Left

Space - Jump/Move Up In Vehicle
Ctrl - Move Down In Vehicle

Z - Rotate Left
C - Rotate Right

Q - Toggle Run/Walk
R - Auto Move

Left+Right Mouse - Walk in direction of camera.

Default Camera Controls:

Alt - Switch between aim and cursor mode
V - Camera Swap
V [Hold] - Activate Photo Camera

Middle Mouse [Hold] - Rotate camera, Release to Re-center

Mouse Wheel - Zoom in when in Ready Mode (to scope if available)
Left Shift - Toggle Zoom (when available)

Interaction Controls:
E or Right Mouse - Use Tool
F or Right Mouse - Auto Use Tool


ESC - Aborts Auto Use Tool, deselects target or closes window depending on context. Will also allow you to access the options, keyboard controls and exit Entropia.


Mouse Controls:


Aim Mode:
Left Mouse - Move to and interact, Select hunting target


Cursor Mode:
Left Mouse, 3rd person - Select Target or Interact/Use Tool on an Already Selected Target

Right Mouse, 3rd person - If object has a context menu, open context menu.
Right Mouse [Hold], 3rd person - Camera

Left Mouse
, 1st person - Use tool
Right Mouse, 1st person - Interact/Auto use tool on target

Other Mouse Controls:
Mouse 3 - Rotate Camera
Mouse 4 - Auto Run


Default Interface Controls:

X - Ready/Relax tool
G - Unequip Tool
TAB - Selects, Switches or !Deselects Target depending on Context

T - Teleport to nearest Revive Terminal

I - Inventory
K - Skills

P - Professions
J - Mission Log
B - Event List
H - Hall of Fame
M - Map of Current Planet/Territory

Y - Message Center
U - Contacts
O - Options


L - Edit Panel
N - Action Library


F1 to F9 - Select Key Map Set
F10 - Show Keyboard Map On Screen
F11 - Society Interface

F12 - Exit
(- or /) - Recall All Vehicles
(,) - Show Position in Chat Window
(.) - Show Current Entropia Time in Chat Window


Print Screen - Take a Screenshot, See Chat Window for Save Location


Chat:
Return - Start Chat and Send Message in Chat.

The up and down key while chat is in focus will scroll threw previous message sent.

Sunday, 17 February 2019

Guide: Finding Items

(Since VU16, this guide has become out of date. Click here for an up to date guide!)

In Entropia it is possible to stumble across free natural items simply by walking around or stopping for a few seconds. These items include fruit, natural stones and dung.


Learn To Walk

You are only able to see fruit, natural stones and dung if you are walking or standing still, you will not see these when running.

To toggle between running and walking press "Q". No skill is required or gained in searching for natural items.

The best way to find natural items is to walk the paths least walked, they can spawn anywhere on the floor across any planet, so the places least walked will surely be more likely to have more! It is best to have the camera in 3rd person to get a good view around your character.

Items come into view at a much smaller range than everything else you can see. When you do find items, simply right click on it and pick it up.

Specifically going out and looking for natural items is harder than sweating and will require more patience. Also as there is no skill gain in finding these items, your character is not growing.
.
Fruit can be refined into nutrio bars by putting any fruit and sweetstuff into a refiner, sweetstuff is an energy matter which is mined and nutrio bars are used to feed pets. Natural stones are used in crafting and dung are used by land owners.

Finding Oil


Roctropia Docks (Red Square)
There are a number of locations in Entropia where you will be able to find and collect crude oil. You do not need to be walking to be able to see these oils barrels.

These barrels can be found in certain PvP areas, on Calypso, Arkadia and Rocktropia. You can not be looted in these PvP areas, so you can try as much as you want without worrying about losing anything. If you do happen to get attacked, you will likely gain evasion and dodge skill.

Arkadia Oil Rig (Red Circle)
The easiest place to get access to crude oil is the docks on Rocktropia, as there are no animals or robots in this area to attack you, you can  simply walk into this area on foot with no issues and the respawn point is right next to the area.

The closest teleporter to the docks which every new person starts with is The Hyperplex.  Crude oil will spawn anywhere in the dock area on the floor.

The only threat here is a very small minority of other people, most people come here for oil and do not wish to waste ammo.

The oil rig on Arkadia is harder to get to because it is surrounded by the native life. The best way to get to the center of the rig is to fly in a vehicle. The closest teleport to this rig is Scrap Yard.

Crude oil  can be refined into oil, which can be crafted with or used to refill your vehicles.

There are a number of other rigs that exist in Entropia, for example the Beer Garden Draft on Rocktropia drops the Motorhead kegs. Which are used specifically in crafting items using blueprints from Rocktropia.

Saturday, 16 February 2019

Guide: Edit Interface

(Since VU16, this guide has become out of date. Click here for an up to date guide!)

This guide will show you how flexible the overall interface in Entropia is, here you will learn about the chat interface, heads up display, waypoints, keyboard controls, contacts list and a few other display related options.

The Edit Panel

Normally only the radar, global display and chat windows can be moved, buttons can only be clicked/right clicked.

Pressing the "L" key on your keyboard will bring up the "Edit Panel". While the edit panel is open you will be able to move/add/remove most of the buttons that are on your screen simply by dragging the buttons, except the main buttons in the top right, these will be greyed out. "F1" through to "F9" lets you to switch between layouts, allowing you to set up multiple key bindings and on screen buttons.

The edit panel consists of two windows, the main window and the recycle bin window, this is where you can drag buttons you no longer want.

The first button on the main window will bring up the keyboard layout. This is where you can bind buttons to keyboard keys, allowing you to quickly access to things from your inventory or an action.


The second button will open the Action Library. This is where you can find buttons for actions in Entropia. A few examples of action buttons in Entropia are emotes, dances, vehicle controls, interface controls and interaction controls. One of the most useful actions in Entropia is the "Auto Use Tool" button, this button is not set to anything by default at the start.


The third button will open your Inventory. While the edit panel is open, you will be able to drag items from your inventory to your screen or keyboard. This includes weapons, armour parts, clothing, tools, vehicles and mind force chips.

The forth button on the edit panel simply resets everything back to default.

You are able to create a button to equip multiple clothes or multiple armour part in one button, this can be done by first equipping what you want, then right click>Equipment>Create Armour/Cloth Set. This also drastically speeds up the equipping time of these items.


The Chat Interface

The chat system is as simple as any other game, press enter, type message, press enter again to send. If you press up or down while the chat window is active, you will be able to scroll threw previous messages, this is handy for trading.

To change what chat channel you are talking in, on the left of where you type your message will be the channel name of the channel you are talking in, click that to change channel. The default will be [Local].

[Local] Non-trade, local area chat.
[Trade] Local area chat used for trading.
[Rookie] A global channel for advice.
[Society] Global channel, chat with society.
[#Trade] Any channel starting with a "#" is a custom chat channel created by a player. These channels are global chat channels.

You can also change your chat channels by clicking on the channel link in the chat window next to a players name chatting in that chat channel already.

If you right click the tabs at the top of the chat window, you can select what channels you want to display in what tab and what colour to display it in. You will also be able to create new tabs and remove unwanted tabs.

If you drag a tab off of the window, you can create multiple chat windows, to merge a window simply drag it to the window you want. The button next to the X top right, the arrows point down, merges all tabs in that window to the main window.

To send a private message to someone, simply click their name link in chat or right click their avatars and goto avatar, private chat.

There are also a number of chats commands which you can used, the most commonly used command is "/pos" or "/p" which displayed your position in the chat channel you are in, in the form of a nice clickable waypoint. Another useful command is "/join #channel", which is used to join a custom chat channel. To see a full up to date list of commands type "/help".

Map And Waypoints

To bring up the map press "M", here you will be able to see your location, known teleporter locations and known area location on the map. Missions with a waypoint that are currently active will show up here along with any custom waypoints added.

To add a custom waypoint to the map, right click the location, then click add waypoint.
Alternatively, you can also click on waypoint link from chat to add a waypoint someone sent.

If you right click a waypoint added on your map, you will be able to rename and copy that waypoint allowing you to send waypoints with custom names. Walking over a waypoint automatically removes it from your map.

To add more teleporter location, you must find and walk over the teleporters, once added you can freely move between teleporter.


The map can also be used to download space stations, planets and space itself all in game. With the drop down menu at the top, select what map you want, then click the play/pause button next to it start/pause downloading. A window will pop up with a download bar.

When on a planets, you will only be able to see space and other planet  related maps in this drop down menu, for example Arkadia and Arkadia Underground, when in space you will see all the planets here.


The Message Center, Sticky notes and Contacts

In the top left corner of your HUD, you will find the message center button, and in the top right corner of your HUD is the contacts list button.

The message center will turn orange when there are unread messages with the number of unread messages showing up as a number above it, and what type of message it is under.


Along the top of the message center screen you will see 7 buttons, the little button on the left is the 'New' button, this is used to create a message or a sticky note. Message center messages are able to be sent to offline people and are kept in the message center until deleted, just like an in game email.

Sticky notes are a handy way of storing handing information in a note on screen, these notes are also stored in the message center until deleted. To remove from screen and save in the message center, click the arrow buttons in the top right of the stick notes corner. To change the sticky note colour or to delete the sticky notes, click the setting button in the top left corner of the note.

The 6 other buttons along the top of the message center are used to filter messages in the message center, from left to right these are what the buttons filter: "Auction Messages", "Sticky Notes", "Mail", "System Messages", "Global/Hall Of Fame", and "Tutorial Messages".

The contacts window will give you the ability to change your player profile and online visibility to other people. You can also view and send messages to friends, society members and disciples.

Setting And Other Options


There are a few more interface options in the setting, which is accessed via the "Esc" key. In the setting, and clicking HUD.

If you disable the loot window, instead of a window filling up with loot that you have to keep closing, you get a small temporary display of the loot in text with the trade terminal value next to it in the top left corner of the screen.

Here you will also be able to adjust the frequency of the global ticker, the higher the PED the less frequent, and how the ticker is displayed, always visible or invisible when not active.

A few other useful options here are the text size options, hide tutorials and align satnav with camera. Changing the satnav option will effect if the satnav is locked to north or lock to the the camera.

Friday, 15 February 2019

Guide: Sweating

(Since VU16, this guide has become out of date. Click here for up to date guide!)

This guide will teach you all about sweating animals within Entropia. The only tool that is needed is the VSE MK1, which every player gets right from the start, but a healing tool and a vehicle will be handy for this guide. (Valkyrie car can be acquired from Thule the tutorial area, and a Vivo S10 healing tool can be acquired from the gauntlet).

Simple Sweating

To start sweating, simply go to the tools tab in your inventory (I on keyboard), and right click on the green round gun called the VSE MK1 to equip it. Then find a creature to click on a few times, after a few attempts, you will see a green mist, this is the extracting phase.

In the extracting phase if you get hit or the creature moves out of your cross hairs, you will fail to extract. If you do not get hit and you keep the creature in your cross hairs for a few seconds, you will acquire some sweat.

After a number of extractions the creature will run dry on sweat, after this you will want to kill it, most people run to a turret and some shoot it, you can also drown the creature in water.

The skills you will gain while sweating are also valuable in a number of other professions, including hunting, mind force, and healing. With a tiny increase to other skills not related to these.

Auto Sweating

Sweating is as simple as that, but there are a few things that will make sweating so much easier.

The "Auto Use Tool" button! This will not only save your wrists, but will help in other things like shooting and repairing. To quickly set this up, press L to open the Edit Panel, press G to open up Keyboard Layout, then press Y to bring up the Action Library Book.

In the Action Library book write "Auto" into the search bar and then click on "Auto Use Tool", the page will turn, then drag "Auto Use Tool" to your screens heads up display or to a black keyboard key. Once you have done that, simply close all them windows. This button/key will allow you to toggle repeat fire mode.

You can learn more about the edit panel here:
Guide: Edit Interface

Group Sweating Locations

There are a number of locations where players sweat in a group to share damage to last longer, heal less and get more sweat. Overall this method will provide much more sweat in a shorter time but you will acquire less evade experience.

When sweating in a group of people, in the perfect situation, every one should stand in a circle around the animal, so that the animal does not run about to hit its target, causing failed extractions.
The creature should only need to turn on the spot to reach its next target.
If the animal hits you, do not move and do not panic, it is not worth running, if the creature can hit you, it will hit you, moving does not effect your ability to evade a hit. If anything, the more you get hit, the more likely you will gain evade experience, the more likely you will be able to evade hits in future. The ability to evade is one of the more sought after skills for a hunter.


The easiest group sweating location to get to is Boreas. Teleport to the Isle of Troy then travel west to the edge where the land is no longer a solid green. From there you will be able to teleport or die and revive at Boreas. This is where a vehicle could come in handy.

Selling Sweat

The VSE MK1 does not degrade. You can use it as much as you want. This is one of the free abilities in Entropia, Sweat in itself is a valueless item to the system.
The value of sweat to a buyer depends on their needs for the sweat, and to a seller the value depends on their persistence to always be patient and look for a better price.

When it come to selling sweat, patience is a virtue, everyone has the ability to sweat, but not everyone has the ability to craft using that sweat, this means sweat is in a much higher supply than demand.

The best places to find buyers is at a group sweating locations, when a buyer wants to buy, the first thing they think is "Where are there lots of sweaters?".

These buyers tend to come and go in moments compared to how long sweaters sweat for at these locations. Calling out  "WTS Sweat" will not help, almost everyone wants to sell sweat.

The best thing you can do is to sweat a bit more to sell more for when that valuable buyer comes by, and when that buyer does come by, make a note of that persons name and their price, make a friend, and sell for the best price you can. Sweat is normally sold in stacks of 1000, check with other sweaters for the average selling price at the time so you know what to aim for and you are not undercutting yourself.

Uses For Sweat

Last but not least, many new people wonder what sweat is actually used for. The top 3 uses for sweat are making mind essence, making welding wires and missions.

Mind essence can be made by mixing force nexus and sweat in a refiner. Force nexus is an energy matter that is mined. You are able to purchase a standard refiner from a trade terminal.

Some blueprints like the welding wire blueprint requires sweat along with other materials, welding wires are used like ammo with the vehicle repair tool to repair vehicles.

There are also a number of missions that require sweat to complete, a few examples of these are the Arkadia Passport missions and Missions Galactica.


Thursday, 7 February 2019

Update soon...

Please Stand By...

...Update Coming Soon...

In the next coming month creating an in depth tutorials page. I will be post each individual tutorial as it comes. Thank you for every persons support so far.