This guide will show you how flexible the overall interface in Entropia is, here you will learn about the chat interface, heads up display, waypoints, keyboard controls, contacts list and a few other display related options.
Right Click
Holding right click will bring up a context menu with other options relating to the target. Vehicles, avatars and creatures have extra options which can be accessed this way. If you right click your health bar, you access options relating to yourself, you are also able right click your vehicles health bar too. When in first person view right click is interact.
The Edit Panel
Normally only the radar, global display and chat windows can be moved, buttons can only be clicked/right clicked.
Pressing the "L" key on your keyboard will bring up the "Edit Panel". While the edit panel is open you will be able to move/add/remove most of the buttons that are on your screen simply by dragging the buttons. "F1" through to "F9" lets you to switch between layouts, allowing you to set up multiple key bindings and on screen buttons. The first layout on the keybinding map when you open this menu allows you to edit all key bindings from page 1 to 9, this page is defined by a "*" and allows you to edit the default key layout of all sets, these keys can be overwritten by each individual set without effecting the main set.
The edit panel consists of two windows, the main window and the recycle bin window, this is where you can drag buttons you no longer want.
The first button on the main window will bring up the keyboard layout. This is where you can bind buttons to keyboard keys, allowing you to quickly access to things from your inventory or an action.
The second button will open the Action Library. This is where you can find buttons for actions in Entropia. A few examples of action buttons in Entropia are emotes, dances, vehicle controls, interface controls and interaction controls. The of the most useful actions in Entropia is the "Use Tool" and "Interact" buttons, these are the two main buttons for interacting with the world.
The third button will resets your current interface layout and the forth button on the edit panel simply resets everything back to default.
While the edit panel is open, you will be able to drag items from your inventory to your screen or keyboard. This includes weapons, armour parts, clothing, tools, vehicles and mind force chips.
You are able to create a button to equip multiple clothes or multiple armour part in one button, this can be done by first equipping what you want, then right click>Equipment>Create Armour/Cloth Set. This also drastically speeds up the equipping time of these items.
The Chat Interface
The chat system is as simple as any other game, press enter, type message, press enter again to send. If you press up or down while the chat window is active, you will be able to scroll threw previous messages, this is handy for trading.
To change what chat channel you are talking in, on the left of where you type your message will be the channel name of the channel you are talking in, click that to change channel. The default will be [Local].
[Local] Non-trade, local area chat.
[Trade] Local area chat used for trading.
[Rookie] A global channel for advice.
[Society] Global channel, chat with society.
[#Trade] Any channel starting with a "#" is a custom chat channel created by a player. These channels are global chat channels.
You can also change your chat channels by clicking on the channel link in the chat window next to a players name chatting in that chat channel already.
If you right click the tabs at the top of the chat window, you can select what channels you want to display in what tab and what colour to display it in. You will also be able to create new tabs and remove unwanted tabs.
If you drag a tab off of the window, you can create multiple chat windows, to merge a window simply drag it to the window you want. The button next to the X top right, the arrows point down, merges all tabs in that window to the main window.
To send a private message to someone, simply click their name link in chat or right click their avatars and goto avatar, private chat.
There are also a number of chats commands which you can used, the most commonly used command is "/pos" or "/p" which displayed your position in the chat channel you are in, in the form of a nice clickable waypoint. Another useful command is "/join #channel", which is used to join a custom chat channel. To see a full up to date list of commands type "/help".
Map And Waypoints
To bring up the map press "M", here you will be able to see your location, known teleporter locations and known area location on the map. Missions with a waypoint that are currently active will show up here along with any custom waypoints added.
To add a custom waypoint to the map, right click the location, then click add waypoint.
Alternatively, you can also click on waypoint link from chat to add a waypoint someone sent.
If you right click a waypoint added on your map, you will be able to rename and copy that waypoint allowing you to send waypoints with custom names. Walking over a waypoint automatically removes it from your map.
To add more teleporter location, you must find and walk over the teleporters, once added you can freely move between teleporter.
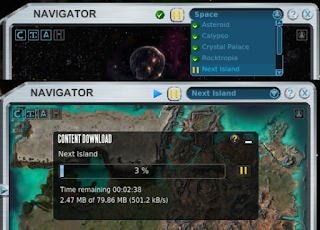
The map can also be used to download space stations, planets and space itself all in game. With the drop down menu at the top, select what map you want, then click the play/pause button next to it start/pause downloading. A window will pop up with a download bar.
When on a planets, you will only be able to see space and other planet related maps in this drop down menu, for example Arkadia and Arkadia Underground, when in space you will see all the planets here.
The Message Center, Sticky notes and Contacts

In the top left corner of your HUD, you will find the message center button, and in the top right corner of your HUD is the contacts list button.
The message center will turn orange when there are unread messages with the number of unread messages showing up as a number above it, and what type of message it is under.
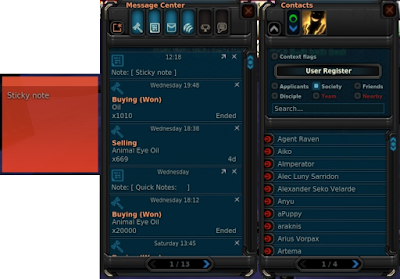
Along the top of the message center screen you will see 7 buttons, the little button on the left is the 'New' button, this is used to create a message or a sticky note. Message center messages are able to be sent to offline people and are kept in the message center until deleted, just like an in game email.
Sticky notes are a handy way of storing handing information in a note on screen, these notes are also stored in the message center until deleted. To remove from screen and save in the message center, click the arrow buttons in the top right of the stick notes corner. To change the sticky note colour or to delete the sticky notes, click the setting button in the top left corner of the note.
The 6 other buttons along the top of the message center are used to filter messages in the message center, from left to right these are what the buttons filter: "Auction Messages", "Sticky Notes", "Mail", "System Messages", "Global/Hall Of Fame", and "Tutorial Messages".
The contacts window will give you the ability to change your player profile and online visibility to other people. You can also view and send messages to friends, society members and disciples.
Setting And Other Options
There are a few more interface options in the setting, which is accessed via the "Esc" key. In the setting, and clicking HUD.
If you disable the loot window, instead of a window filling up with loot that you have to keep closing, you get a small temporary display of the loot in text with the trade terminal value next to it in the top left corner of the screen.
Here you will also be able to adjust the frequency of the global ticker, the higher the PED the less frequent, and how the ticker is displayed, always visible or invisible when not active.
A few other useful options here are the text size options, hide tutorials and align satnav with camera. Changing the satnav option will effect if the satnav is locked to north or lock to the the camera.
The current interface has only been recently released, and as continued update are applied more options may become available very soon in the future.
Default Control Setup
Default Moment Controls:
W - Move forward
S - Move backward/Towards camera
A - Move Left/Strafe Left
D - Move Right/Strafe Left
Space - Jump/Move Up In Vehicle
Ctrl - Move Down In Vehicle
Z - Rotate Left
C - Rotate Right
Q - Toggle Run/Walk
R - Auto Move
Left+Right Mouse - Walk in direction of camera.
Default Camera Controls:
Alt - Switch between aim and cursor mode
V - Camera Swap
V [Hold] - Activate Photo Camera
Middle Mouse [Hold] - Rotate camera, Release to Re-center
Mouse Wheel - Zoom in when in Ready Mode (to scope if available)
Left Shift - Toggle Zoom (when available)
Interaction Controls:
E or Right Mouse - Use Tool
F or Right Mouse - Auto Use Tool
ESC - Aborts Auto Use Tool, deselects target or closes window depending on context. Will also allow you to access the options, keyboard controls and exit Entropia.
Mouse Controls:
Aim Mode:
Left Mouse - Move to and interact, Select hunting target
Cursor Mode:
Left Mouse, 3rd person - Select Target or Interact/Use Tool on an Already Selected Target
Right Mouse, 3rd person - If object has a context menu, open context menu.
Right Mouse [Hold], 3rd person - Camera
Left Mouse, 1st person - Use tool
Right Mouse, 1st person - Interact/Auto use tool on target
Other Mouse Controls:
Mouse 3 - Rotate Camera
Mouse 4 - Auto Run
Default Interface Controls:
X - Ready/Relax tool
G - Unequip Tool
TAB - Selects, Switches or !Deselects Target depending on Context
T - Teleport to nearest Revive Terminal
I - Inventory
K - Skills
P - Professions
J - Mission Log
B - Event List
H - Hall of Fame
M - Map of Current Planet/Territory
Y - Message Center
U - Contacts
O - Options
L - Edit Panel
N - Action Library
F1 to F9 - Select Key Map Set
F10 - Show Keyboard Map On Screen
F11 - Society Interface
F12 - Exit
(- or /) - Recall All Vehicles
(,) - Show Position in Chat Window
(.) - Show Current Entropia Time in Chat Window
Print Screen - Take a Screenshot, See Chat Window for Save Location
Chat:
Return - Start Chat and Send Message in Chat.
The up and down key while chat is in focus will scroll threw previous message sent.


 The chance for enhancers to break is now directly and in line with the benefit provided.
 Classified Strongboxes purchased from the web shop can no longer traded between people.


